Preparing Open RV on Windows
Open RV 2025 can be built for Windows using the VFX reference platform. Dependencies can be viewed in the cmake/defaults/ folder. eg cmake/defaults/CY2026.cmake
Select your VFX reference platform by clicking on the appropriate tab. Install instructions follows.
NOTE: CY2025 and CY2026 are experimental. Noteably CY2026 for RV is still on Qt 6.5.3 pending changes necessary for 6.8.3
Boost               : 1.88.0
Cmake               : 3.31.X+
Imath               : 3.2.2
NumPy               : 2.3.0
OCIO                : 2.5.0
OpenEXR             : 3.4.3
OpenSSL             : 3.6.0
Python              : 3.13.9
Qt                  : 6.8.3 ** RV Still on 6.5.3 pending work
Visual Studio       : 2022 (MSVC v143 14.40.X)
Boost               : 1.85.0
Cmake               : 3.31.X+
Imath               : 3.1.12
NumPy               : 1.26.4
OCIO                : 2.4.2
OpenEXR             : 3.3.6
OpenSSL             : 3.4.0
Python              : 3.11.14
Qt                  : 6.5.3
Visual Studio       : 2022 (MSVC v143 14.40.X)
Boost               : 1.82.0
Cmake               : 3.31.X+
Imath               : 3.1.12
NumPy               : 1.24.4
OCIO                : 2.3.2
OpenEXR             : 3.2.5
OpenSSL             : 3.4.0
Python              : 3.11.14
Qt                  : 6.5.3
Visual Studio       : 2022 (MSVC v143 14.40.X)
Boost               : 1.80
Cmake               : 3.31.7
Imath               : 3.1.12
NumPy               : 1.23.5
OCIO                : 2.2.1
OpenEXR             : 3.1.13
OpenSSL             : 1.1.1u
Python              : 3.10.18
Qt                  : 5.15.18
Visual Studio       : 2022 (MSVC v143 14.40.X)
All other dependencies are shared across variations.
Summary
Warning
You should be cloning the repository later in the steps, but if you must clone it beforehand, clone it into the root
of a drive (e.g. c:). See Get Open RV source code.
1. Microsoft Visual Studio
Warning
Open RV will not compile with Microsoft Visual Studio 2022 version 17.11.X with the default compiler because of issues
between PySide2 and that version of the compiler.
You can still install 17.11.X, but you will need to install MSVC v143 version 14.40 to compile Open RV itself and
MSVC v143 14.39.X to compile Boost.
Any variant of Microsoft Visual Studio 2022 will work with Open RV (e.g. Enterprise, Professional or Community). You can select the version on the Visual Studio website.
Installation
Note
Quick guide:
You must select Desktop Development with C++
In the individual components section, you must install MSVC v143 14.40.X for Open RV and MSVC v143 14.39.X to compile Boost.
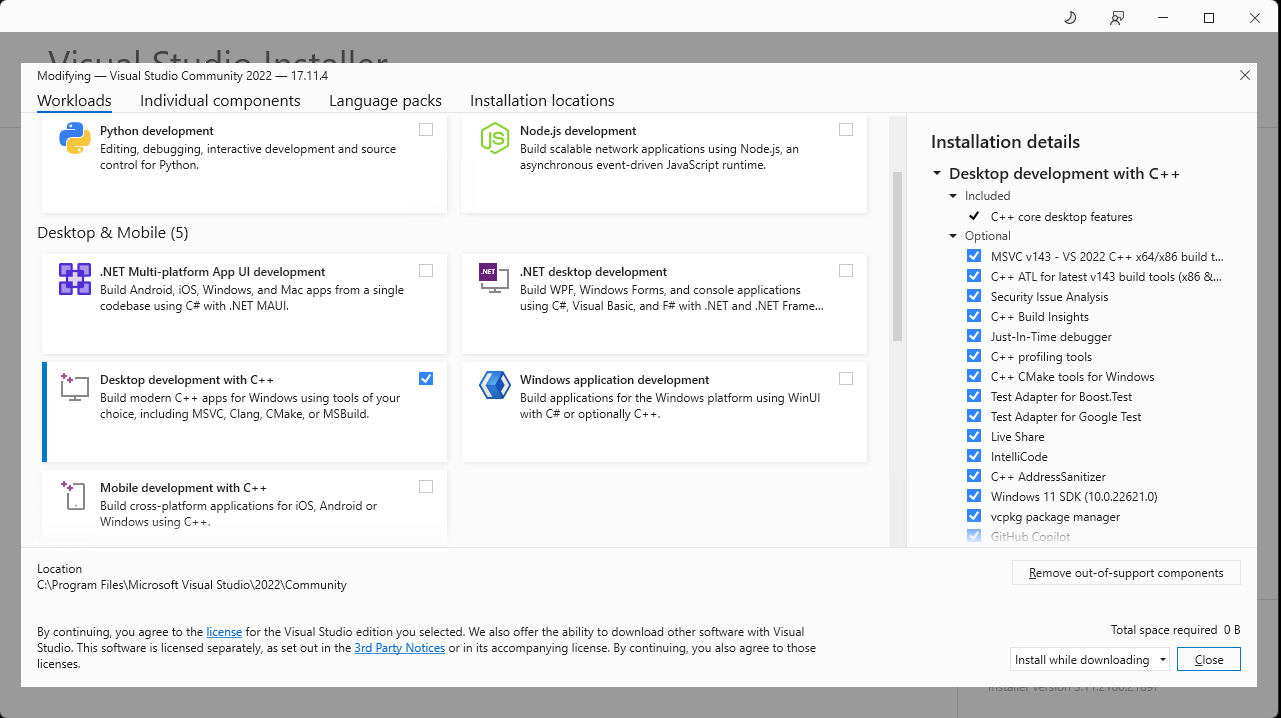
Step 1 - Select Desktop Development with C++
Select the Desktop Development with C++ component
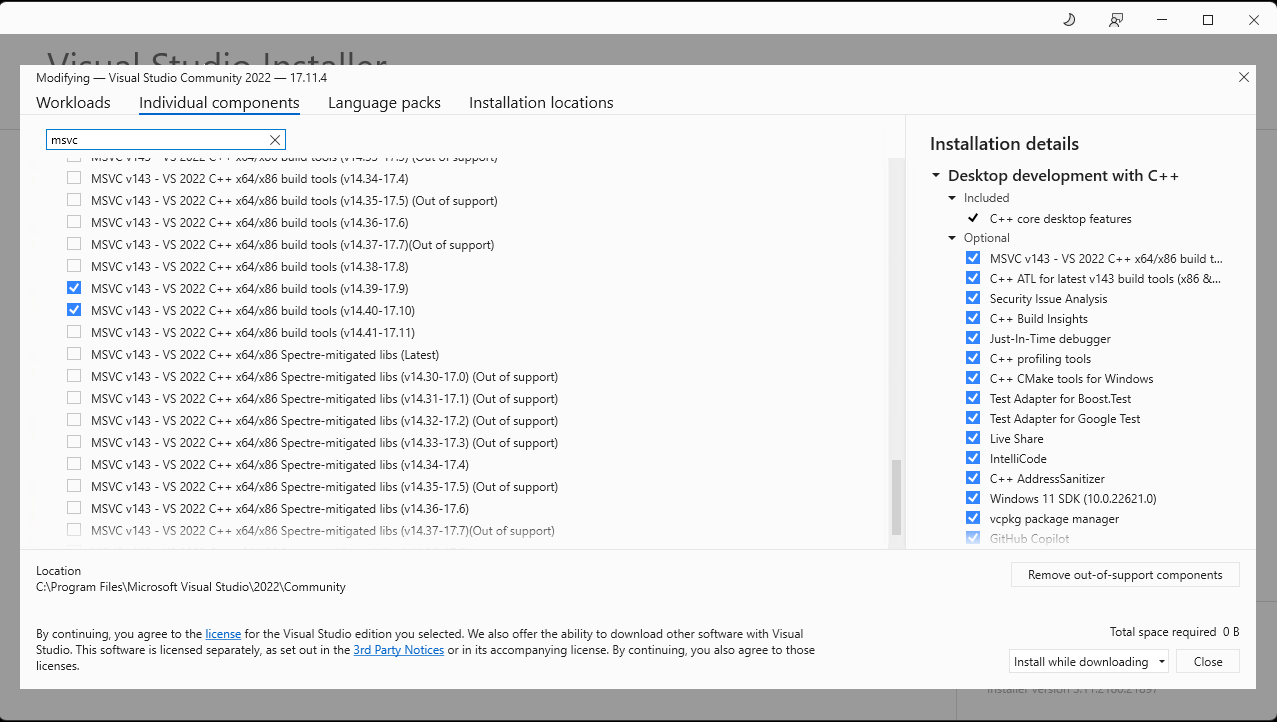
Step 1 - Individual components
Click on the Individual components tab, and search for msvc. Select the following components: MSVC v143 - VS 2022 C++ x64/x86 build tools (v14.39-17.9) and MSVC v143 - VS 2022 C++ x64/x86 build tools (v14.40-17.10).
2. Setup default MSVC compiler
If Microsoft Visual Studio 2022 was installed for the first time (using the steps above), MSVC v143 v14.40 should be
the default compiler, although varying setup may affect this.
To ensure compatibility with Open RV, we need to make sure that MSVC v143 v14.40 is the default compiler.
Here are the possible methods to set the default compiler:
Method 1: Check default props file
The first solution is to modify the Microsoft.VCToolsVersion.v143.default.props under C:\Program Files\Microsoft Visual Studio\2022\Community\VC\Auxiliary\Build.
The path will vary depending on whether the variant is Enterprise, Profressional or Community.
Make sure that the VCToolsVersion is set to 14.40.33807. The file should look similar to this:
<?xml version = "1.0" encoding="utf-8"?>
<Project ToolsVersion = "4.0" xmlns="http://schemas.microsoft.com/developer/msbuild/2003">
  <Import Project="$([System.IO.Path]::GetFullPath($(MSBuildThisFileDirectory)Microsoft.VCRedistVersion.v143.default.props))"/>
  <PropertyGroup>
    <VCToolsVersion Condition = "'$(VCToolsVersion)' == ''" >14.40.33807</VCToolsVersion>
  </PropertyGroup>
</Project>
If the version is different, change it to 14.40.33807 in the file.
3. Install Python 3
You must install the Python version corresponding to your chosen VFX reference platform using the official Python installer.
Install Python 3.11.9 using the official Python installer.
On the [Python 3.11.9 page](https://www.python.org/downloads/release/python-3119), scroll down and download the correct version for your Windows. Typically, the correct version will be **Windows installer (64-bit)**.

It is highly recommended that you install this Python in C:\Python311
Install Python 3.10.13 using the official Python installer.
On the [Python 3.10.13 page](https://www.python.org/downloads/release/python-31013), scroll down and download the correct version for your Windows. Typically, the correct version will be **Windows installer (64-bit)**.

It is highly recommended that you install this Python in C:\Python310
Python Installation Steps
The carousel below shows how to install Python. The displayed images are from Python 3.11.X, but for VFX-CY2023 the path should be C:\Python310 instead of C:\Python311.

Step 1 - Customize installation
Click on the Customize installation button to customize the installation location.
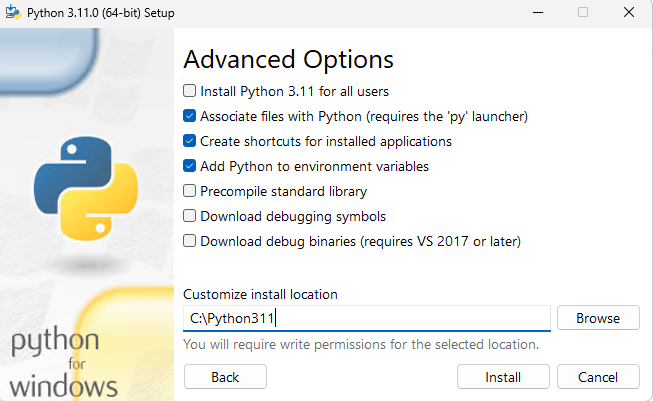
Step 2 - Advanced Options
It is recommended to choose an installation location with a shorter path length (as shown in the image above).
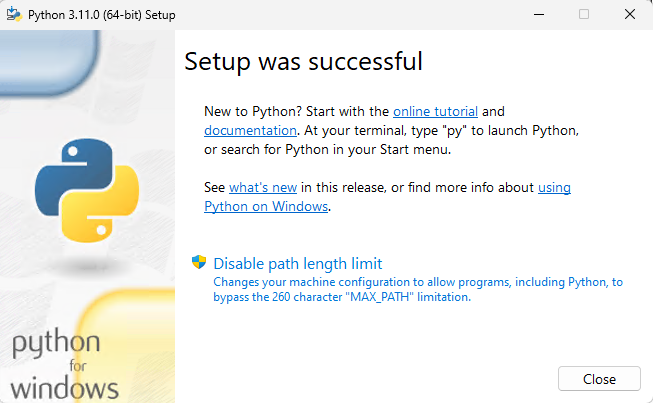
Step 3 - Setup was successful
Click on Disable path length limit
Note
Take note of the installation path for Python 3, as it will be required in a subsequent step.
The recommended path is:
C:\Python311for VFX-CY2024C:\Python310for VFX-CY2023
3.1 Copy python.exe and rename it to python3.exe
Copy the Python executable as python3.exe to ensure compatibility with Open RV, which requires the python3 command.
This also aligns with Linux and macOS conventions, where both python and python3 are valid commands.
4. Install CMake
Warning
Minimum recommended version for CMake is 3.27.X.
Download the lastest version of CMake from the official CMake website. Typically, the correct version will be Windows x64 Installer. Follow the installation wizard prompts to complete the setup. There are no special considerations or unique configuration options required.
Note
Take note of the installation path for CMake, as it will be required in a subsequent step.
The default path is C:\Program Files\CMake.
5. Install Qt
Warning
When obtaining Qt from a third-party source, ensure it includes OpenSSL support and check for the following essential modules that may not be included by default: QtWebEngine, QtWebSockets, QtMultimedia, and QtDeclarative.
For example, Qt from MSYS2 is missing QtWebEngine.
Download the Qt version corresponding to your chosen VFX reference platform from the official Qt website using the online installer. It is recommended to install Qt in a location with a short path length. (e.g. C:\Qt)
Download Qt 6.5.3.
This version should be available in the regular Qt installer without needing archives.
Download Qt 5.15.2 from the Qt archives.
You will need to enable archive packages in the Qt installer to access Qt 5.15.2.
Additionally, ensure you have jom, which is included with Qt Creator, available through the Qt online installer. If you prefer not to install Qt Creator, you can download jom separately from the official Qt repository and copy the executable and supporting files to the Tools/QtCreator/bin/jom directory within your Qt installation.
Installation Steps
For Qt 6.5.3, the installation is more straightforward:

1. **After log in**: Open the setup, log in with your credentials, and proceed through the prompts
2. **Select Qt 6.5.3**: Qt 6.5.3 should be available in the main installer without needing archive packages
3. **Choose components**: Select the MSVC 2019 64-bit component for Qt 6.5.3
4. **Uncheck optional packages**: Uncheck any optional packages you don't need (Android, iOS, WebAssembly, etc.)
5. **Complete installation**: Click 'Next' to proceed with the installation
For Qt 5.15.2, you need to access the archive packages:
1. **After log in**: Open the setup, log in with your credentials, and proceed through the prompts
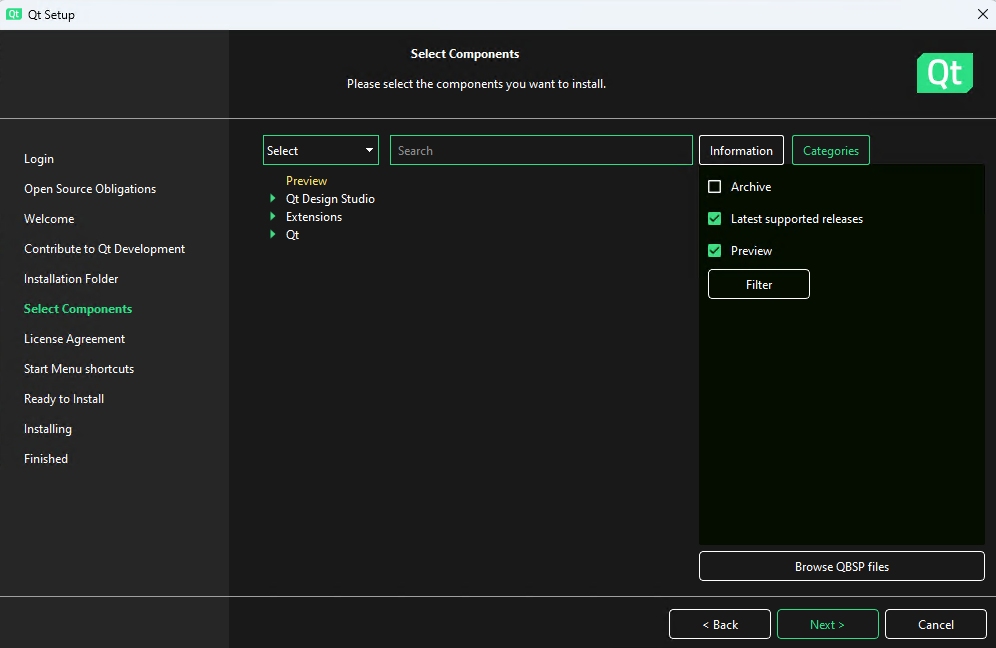
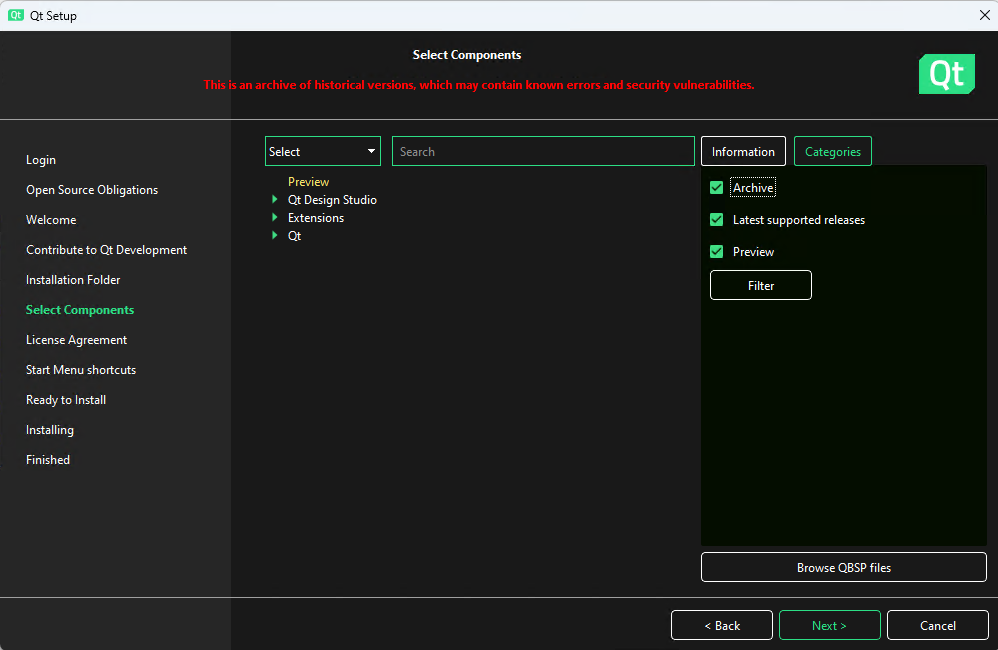
2. **Enable archive packages**: Select the 'Archives' checkbox on the right-hand side to enable and display the archive packages
3. **Filter and load archive packages**: Click the Filter button to load the archive packages and view available options
4. **Check Qt 5.15.2**: Once the archive packages are loaded, scroll down to Qt 5.15.2, select the checkbox, and click the small arrow icon beside it to expand the options
5. **Uncheck optional packages**: Uncheck all optional packages and click the 'Next' button to proceed
Warning
The screenshot below represent the installation for Qt 5, but the steps are the same for Qt 6. The only difference is the selection of Qt 6.5.3 instead of Qt 5.15.2 in the fourth screenshot.
Step 1 - After log in
Open the setup, log in with your credentials, and proceed through the prompts until you reach this step.
Step 2 - Enable archive packages (VFX-CY2023 only)
For Qt 5.15.2, select the 'Archives' checkbox on the right-hand side to enable and display the archive packages.
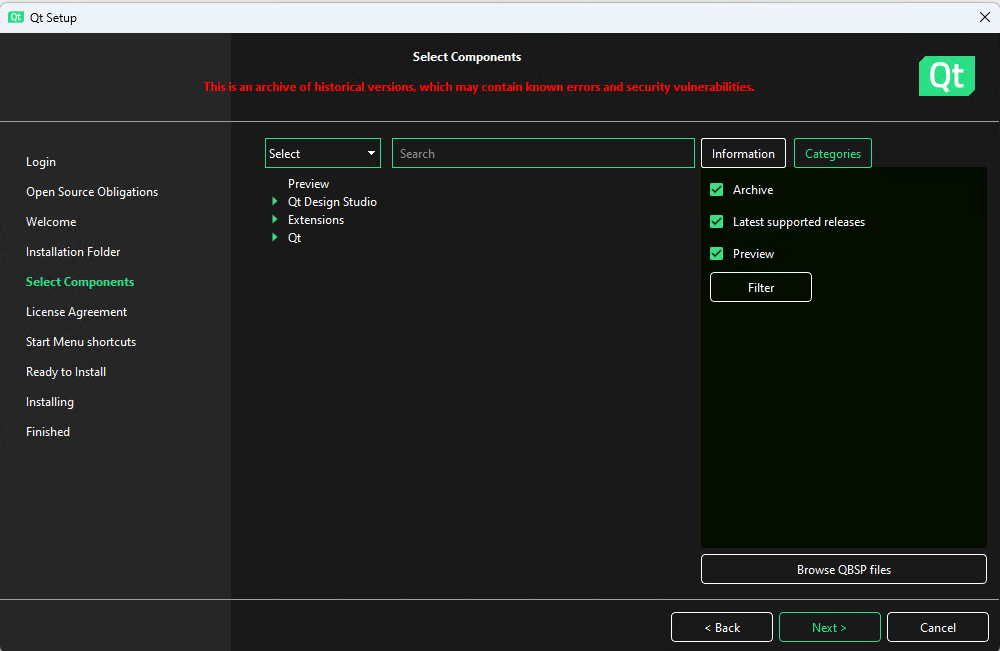
Step 3 - Filter and load archive packages (VFX-CY2023 only)
For Qt 5.15.2, click the Filter button to load the archive packages and view available options.
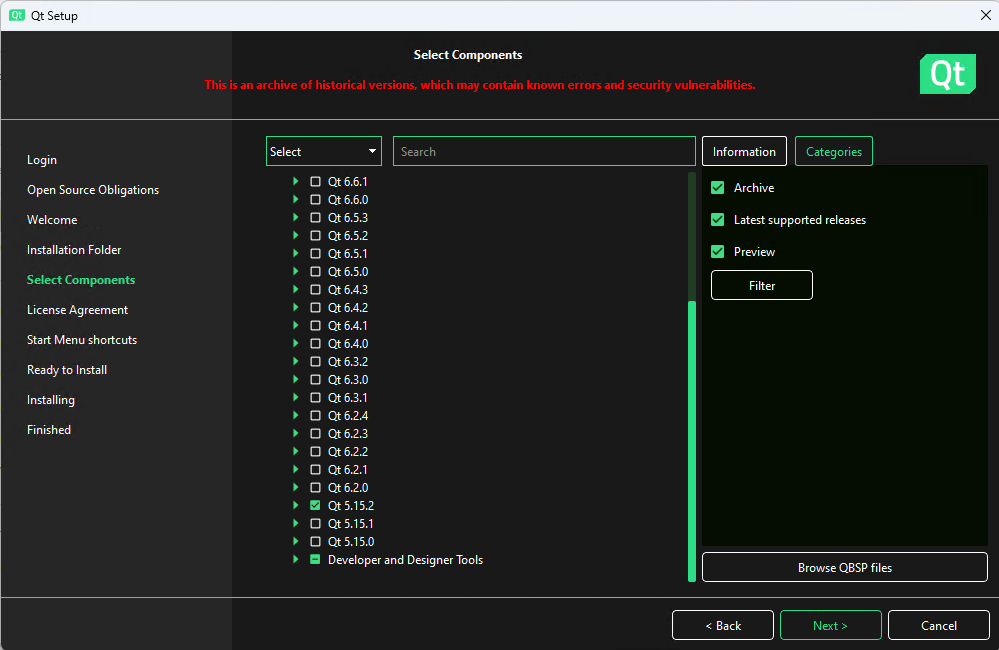
Step 4 - Check Qt version
For VFX-CY2024: select Qt 6.5.3 from the main list. For VFX-CY2023: scroll down to Qt 5.15.2, select the checkbox, and expand the options.
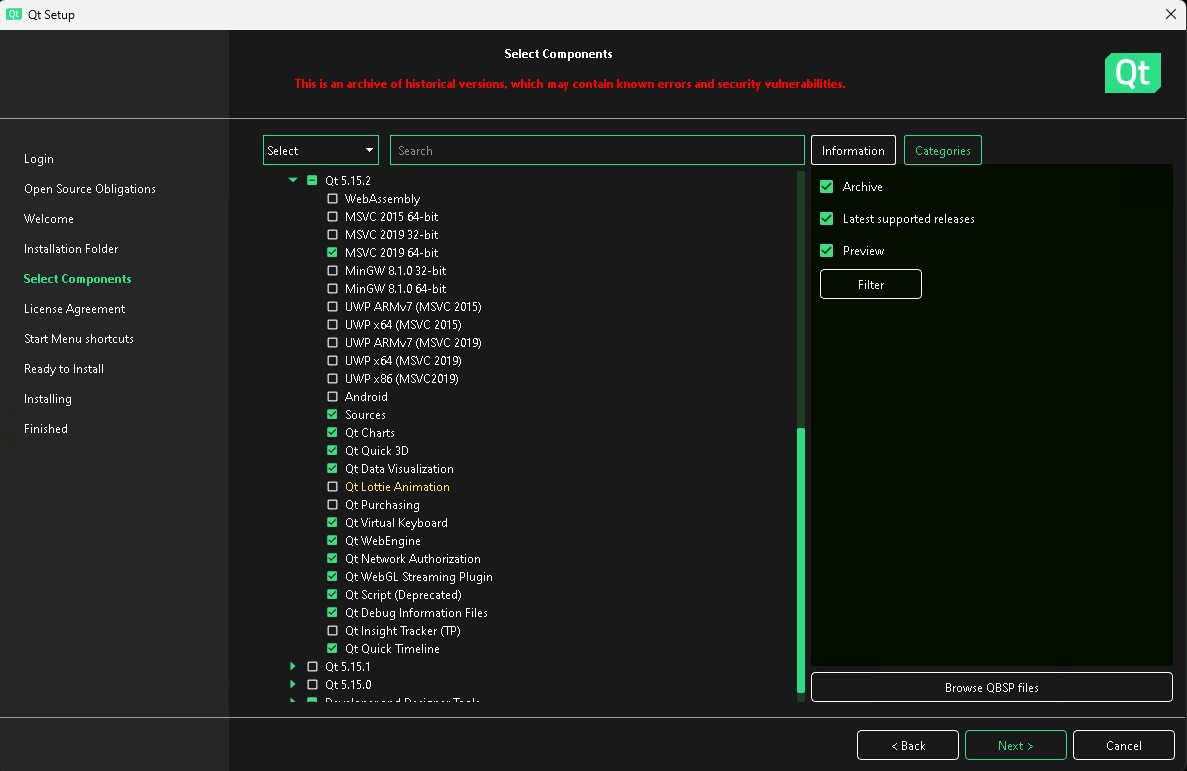
Step 5 - Uncheck optional packages and install
Uncheck all optional packages (as shown in the image above) and click the 'Next' button to proceed.
Note
Take note of the installation path for Qt, as it will be required in a subsequent step.
Based on the recommendation above, the path would be:
C:\Qt\6.5.3\msvc2019_64for VFX-CY2024C:\Qt\5.15.2\msvc2019_64for VFX-CY2023
6. Install Strawberry Perl
Download and install the 64-bit version of Strawberry Perl
Note
Take note of the installation path for Strawberry Perl, as it will be required in a subsequent step.
The default path is C:\Strawberry.
7. Install Rust
Warning
Rust version 1.92 or later is required to build certain Python dependencies (such as cryptography).
Install Rust using rustup-init:
Download rustup-init from https://win.rustup.rs/x86_64
Run
rustup-init.exeFollow the prompts to complete the installation (the default options are recommended)
After installation, close and reopen your terminal to apply the PATH changes
Verify that Rust is installed correctly and check the version:
rustc --version
cargo --version
Note
The Rust installation will be located at %USERPROFILE%\.cargo\bin (typically C:\Users\<username>\.cargo\bin). Do not forget to add the location to the PATH environment variable in Setup environment variables.
8. Install MSYS2
Warning
The Windows’ WSL2 feature conflict with MSYS2. For simplicity, it is highly recommended to disable Windows’ WSL or WSL2 feature entirely.
Additional information can be found on the MSYS2 github.
Download and install the latest MSYS2. Open RV is NOT a mingw64 build. It is a Microscoft Visual Studio 2022 build. Open RV is built with Microsoft Visual Studio 2022 via the CMake “Visual Studio 17 2022” generator.
MSYS2 is only used for convenience as it comes with a package manager with utility packages required for the Open RV build such as cmake, git, flex, bison, nasm, unzip, zip, etc.
8.1 Install required MSYS2 pacman packages
Note
The MSYS2 MingGW64 (mingw64.exe) terminal MUST be used.
Other executables such as MSYS2 (msys2.exe) or MSYS2 MingGW32 (mingw32.exe) will not work.\

From a MSYS2-MinGW64 shell, install the following packages which are required to build Open RV:
pacman -Sy --needed \
        mingw-w64-x86_64-autotools \
        mingw-w64-x86_64-glew \
        mingw-w64-x86_64-libarchive \
        mingw-w64-x86_64-make \
        mingw-w64-x86_64-meson \
        mingw-w64-x86_64-toolchain \
        autoconf  \
        automake \
        bison \
        flex \
        git \
        libtool \
        nasm \
        p7zip \
        patch \
        unzip \
        zip
While installing the MSYS packages, review the list for any missing package. Some packages might not be installed after the first command.
8.2 Install sccache for faster builds (recommended)
sccache dramatically speeds up rebuild times by caching compiled objects (50-80% faster rebuilds). On Windows, sccache is preferred over ccache for better MSVC compatibility.
From the same MSYS2-MinGW64 shell, install sccache using the Mozilla-Actions installer or download directly:
Option 1: Using Chocolatey (if available on your system)
choco install sccache
Option 2: Manual download (recommended for MSYS2)
Download the latest sccache release from https://github.com/mozilla/sccache/releases
Extract
sccache.exeto a directory in your PATH (e.g.,C:\msys64\mingw64\bin)
Verify sccache is available:
sccache --version
OpenRV will automatically detect and use sccache when available.
Note
First-time build: sccache has no effect on the first build as it establishes the cache. Subsequent builds: You’ll see significant speedups (50-80% faster) on incremental or clean rebuilds.
To check sccache statistics after building:
sccache --show-stats
To disable sccache if needed:
export RV_DISABLE_COMPILER_CACHE=1
Note: To confirm which version/location of any tool used inside the MSYS shell, where can be used e.g. where python. If there’s more than one path return, the top one will be used.
9. Setup environment variables
Note
This is the step where the path of Strawberry Perl, Python, CMake and Qt will be needed.
Some environment variables need to be set within MSYS2 for the Open RV build system. The PATH environment variable must be modified, new environment variables called ACLOCAL_PATH and QT_HOME must be created.
These modifications will be added to the .bash_profile file located in the User’s home directory within the MSYS2 environment. By modifiying .bash_profile, these environment variable will be modified everytime a new MSYS2 MINGW64 terminal is opened.
PATH environment variable
Note
Update the CMake, Strawberry Perl, Python, and Rust locations to reflect your installation paths, using forward slashes (/) for a Unix-style path to prevent issues later on. (e.g., C:\Python310 becomes /c/Python310).
For Rust: Replace <username> with your actual Windows username. You can find your username by running echo %USERNAME% in a Windows command prompt.
The Rust installation is located at %USERPROFILE%\.cargo\bin (typically C:\Users\<username>\.cargo\bin),
which becomes /c/Users/<username>/.cargo/bin in MSYS2 format.
The following paths must be added to the PATH environment variable within MSYS2:
CMake binary directory
Python binary directory
Rust cargo binary directory
MSYS2’s
mingw64/binStrawberry perl directory
The order is important. Do not put Strawberry perl location before MSYS2’s mingw64/bin directory.
echo 'export PATH="/c/Program Files/CMake/bin:/c/Python311:/c/Users/<username>/.cargo/bin:/c/msys64/mingw64/bin:$PATH:/c/Strawberry/perl/bin"' >> ~/.bash_profile
echo 'export PATH="/c/Program Files/CMake/bin:/c/Python310:/c/Users/<username>/.cargo/bin:/c/msys64/mingw64/bin:$PATH:/c/Strawberry/perl/bin"' >> ~/.bash_profile
Warning
Remember to replace <username> with your actual Windows username in the commands above.
ACLOCAL_PATH
echo "export ACLOCAL_PATH=/c/msys64/usr/share/aclocal" >> ~/.bash_profile
QT_HOME
Note
Update the Qt location to reflect your installation path, using forward slashes (/) for a Unix-style path (e.g., C:\Qt\5.15.2\msvc2019_64 becomes /c/Qt/5.15.2/msvc2019_64).
echo "export QT_HOME=/c/Qt/6.5.3/msvc2019_64" >> ~/.bash_profile
echo "export QT_HOME=/c/Qt/5.15.2/msvc2019_64" >> ~/.bash_profile
Apply changes to MSYS2 MINGW64
All the environment variables changes above must be applied. You can do that by closing and re-opening the MSYS2 MINGW64 terminal or by running the following command:
source ~/.bash_profile
10. Build Open RV
Once the platform-specific installation process is complete, building Open RV follows the same process for all platforms. Please refer to the Common Build Instructions for the complete build process.
Windows-Specific Build Notes
Warning
Even as of Windows 11, for legacy reasons, a default system path length is still limited to 254 bytes long.
For that reason, it is recommended to clone Open RV into the drive’s root directory (e.g.: C:\).
Warning
Open RV repository should be cloned into the root of a drive (e.g. c:).
Otherwise, the PySide2 compilation could be failing due to the path being too long. If you can’t do that, please take a look
at Maximum Path Length Limitation on Microsoft website.